Are you wondering how to write AWS lambda with Deno ?
this is going to be a long post. So please be patient and read the steps carefully. Do also comment in case you have any questions !

Before we begin to discuss the steps for writing AWS lambda with Deno, first you need to know that AWS Lambda supports a limited number of programming Languages as of now.
AWS Lambda supports following languages
-
- Node.js
- Python with these versions
- 2.7
- 3.X
- Java with these versions
- 8
- 11
- .NET core framework
- Ruby
- Go
In a later post I shall be creating a react-app that will use the deno based LAMBDA function which we are going to create in this post
The list of programming languages above we do mention Deno.js
Therefore AWS lambda with Deno is not supported by default.
Do you think it’s because Deno.js is fairly new? Well if that is the case then what about support for php ?
Therefore the question is why AWS doesn’t support all programming languages when writing Lambda?
Because AWS leverages the platform’s “custom-runtime” feature to let developer extend their own choice of programming language
As a result, to manage and run application code with your choice of runtime, you will need to pass the runtime.
Therefore Deno.js or simply put “Deno” can be supported with AWS Lambda function by creating our “custom-runtime” for it !
How do you create a custom runtime to run aws lambda with Deno ?
List of steps to follow to run AWS Lambda with Deno runtime
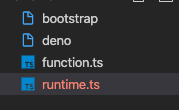
- Firstly, we need the below files
- And after that we will write a “bootstrap” file and package it as part of your lambda function’s zip archive.
- As a result “bootstrap” file is going to have the instructions for loading Deno runtime
- Also “bootstrap” file will run the command “deno run FILENAME.ts –allow- …” inside default shell for our lambda function.

Wait did I just say that there is a shell that you can access to run your aws lambda with Deno ?
Yes that’s exactly what we are going to do. And just to support this statement , I would like bring the point here that for every Lambda runtime, there is always a backing AMI .
Therefore the shell command that we are going to be executing- would actually run inside the shell for the AMI on which we are going to be building our Deno runtime !!!.
(We have done this heavy lifting for you ).
And as part of the code you will fine a “deno” runtime, created from a compatible AMI .
Therefore No need to worry.
This is how our bootstrap file is going to look like
-
-
#!/bin/sh
set -euo pipefail
Firstly, this line will report which was the last command that failed during our execution. If nothing fails, the code will continue to execute further.
-
SCRIPT_DIR=$(cd $(dirname $0); pwd)
HANDLER_NAME=$(echo "$_HANDLER" | cut -d. -f2)
HANDLER_FILE=$(echo "$_HANDLER" | cut -d. -f1)
After that these lines are going to create variable for HANDLER_NAME and HANDLER_FILE. We are using the “_HANDLER” variable to create the variables.
Since the Lambda runtime sets this “_HANDLER” variable.
Follow the video in case you want to see the demo
-
export DENO_DIR=/tmp/deno_dir
Next we need to export the DENO_DIR for writing aws lambda with Deno.js
-
echo "
...
SOME CODE
...

" > /tmp/runtime.ts
And after that we need to write some code for creating the lambda context to run aws lambda with Deno.js
- Finally, we can execute the “deno run … ” command to execute our runtime
$SCRIPT_DIR/deno run --allow-net --allow-read /tmp/runtime.ts
-
- Let’s see how we are going to replace the block “SOME CODE …”
Firstly, we will be adding the below lines of code
-
-
-
import { $HANDLER_NAME } from '$LAMBDA_TASK_ROOT/$HANDLER_FILE.ts';
const _APIROOT =
  'http://${AWS_LAMBDA_RUNTIME_API}/2018-06-01/runtime/invocation/';
const _query = 'Lambda-Runtime-Aws-Request-Id';
And then this two lines will import the Handler file and create api root for invocation
-
(async () => {
  while (true) {
...
actual custom runtime code here
...
}
})();
After that we can create an async function . This function will run infinitely. We will use “while(true)”
And finally, the infinite execution is to ensure that lambda context remains valid for future invocation, even after the current execution has finished
-
-
Custom runtime code inside while(true) block
-
const next = await fetch(_APIROOT + 'next');
const requestId = next.headers.get(_query);
const res = await $HANDLER_NAME(await next.json());
To start with
The above three lines will
- Firstly I declared “next'” invocation variable,
- Then I created a requestId and
- Finally executed the handler function to generate the response code
In the end once the response is generated , I called the Lambda root API with the response.
await (await fetch(
   _APIROOT + requestId + '/response',
   {
    method: 'POST',
    body: JSON.stringify(res)
   }
)).blob();